Deploy a distributed system on AWS
In this tutorial, we will present the architecture of a complete distributed system on AWS. The objective is to have an infrastructure with a distributed, resilient and efficient storage system, on which we can then store data and perform queries.
This project was part of a NoSQL course at Télécom Paris. It was to be done in teams of 4. The constraints were to deploy a cluster with a database allowing a distributed, resilient and efficient storage system, to be able to process 800 GB of data.
I- Architecture
Components
The architecture will be composed of the following components :
- a EC2 cluster, to process the data, with:
- 2 master nodes, that will orchestrate the cluster and interact with the user. The second node is used for resilience;
- 5 worker nodes, to host the database and to process the data;
- 1 dedicated node for Zookeeper.
- a S3 bucket, to store the data.
We will use the following solutions:
- Spark: a framework to manage task execution and parallelization.
- Apache Zeppelin: a notebook interface, to execute code on the cluster via a user interface;
- Apache Cassandra: a NoSQL database management system to store the data.
- Apache Zookeeper: a configuration management software for distributed systems, that we use for resilience.
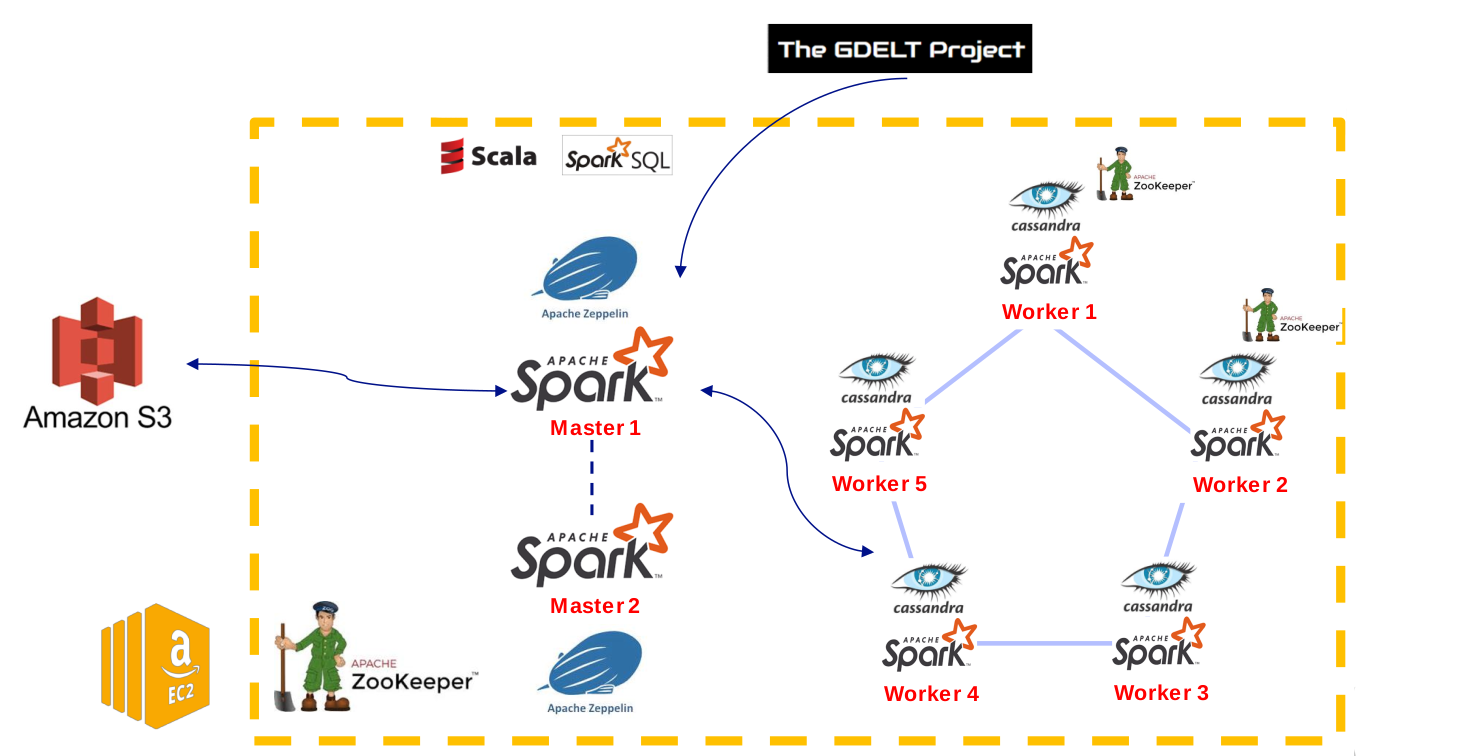
The architecture of the project
We enumerate here the main steps of the installation. For complete details, refers to the dedicated page on the GitHub repo of the project.
Benefits of Cassandra
Cassandra is a NoSQL database management system. It has been created at Facebook and made open source in 2008. It became an Apache top-level project in 2010.
Our choice of Cassandra is based on the CAP theorem, built on three axis: Consistency, Availability and Partition-Tolerance. The theorem states that for a distributed data management system, it is impossible to have more than two of the three stated properties.
Our architecture must be resilient and continue to work, even if a node fails. Based on this constraint, we choose a system which proposes availability and parition-tolerance.
The arguments to choose Cassandra among the other NoSQL databases is its scalability with the possibility to add or remove nodes to the cluster without pausing it. Then, Cassandra has a peer-to-peer architecture with direct communications among workers. This makes a high fault tolerance. To finish, Cassandra gathers rows into partitions, making the reading queries really fast.
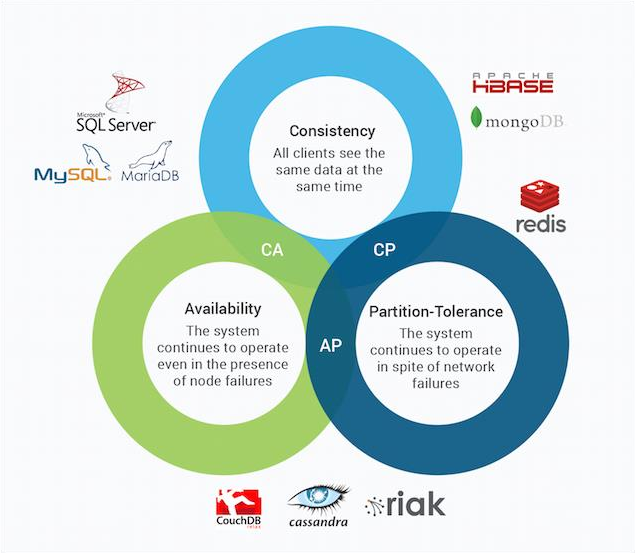
The CAP theorem and the main NoSQL databases
Number of slave nodes
The number of nodes depends on the replication factor we want for our data, and the maximum number of nodes the system can loose and still run correctly.
We choose to be resilient to the lost of 2 nodes. If we loose 2 nodes, we need to have a quorum of the existing replicates. The quorum must be higher than 2, so we set it to 3 nodes. As the quorum is 3 and we can loose 2 nodes, we set a replication factor of 5 (3+2). The number of nodes in our cluster must be at least 5.
II- Installation and configuration
1- Create a EC2 cluster
Amaon EC2 provides virtual machines, known as instances, to deploy our own applications.
We create an instance, with Ubuntu Server 18.04. We start with the type t2.micro for the set up and we will upgrade to m5.xlarge for the calculations, once the cluster is ready. It is a good practice to scale the instance type according to our needs, in order to save cost. Idem for the storage capacity. We select the default role EMR_EC2_DefaultRole which has the needed access rules for our case. We must configure it precisely for security measure if we use it in production. We also set security rules by adding one rule to allow our IP address to communicate with port 22 via SSH.
We launch 8 instances with this configuration.
Once the cluster is launched, we generate a key pair, necessary to connect to the instances.
We connect through the AWS cli, to each instance, identified by its IP address:
cd PATH_TO_YOUR_KEYPAIR
ssh -i "gdeltKeyPair.pem" ubuntu@<copy the public DNS>
We then install the Java SD8 and python, required by Zookeeper and Cassandra:
sudo apt-get install openjdk-8-jre
sudo apt-get install python
2- Install and set Cassandra
To install Cassandra, we need to download it to each node. Once the archive is extracted, we modify the configuration file cassandra.yaml:
cluster_name: name of our clusterseed_provider: private IP addresses of Cassandra nodeslisten_address: private IP address of the node on which we arerpc_address: private IP address of the node on which we areendpoint_snitch: put Ec2Snitch
We start cassandra on each node, with the command cassandra. The logs show that the nodes handshake with each others.
We can then execute these commands to display the cluster details:
./nodetool status
./nodetool describecluster
3- Install Zookeeper
Zookeeper will be installed on a dedicated node. Zookeeper doesn’t consume a lot of resources, but it is a choice made to isolate it to prevent interferences. Zookeeper will also be installed on two slave nodes.
We install Zookeeper before Spark, for simplicity. As for Cassandra, we connect to the instances, download Zookeeper, and extract it. Then, we create the folders data and logs, and a file, myid, containing a unique id different for each Zookeeper instance. To finish, we create a configuration file zoo.cfg, in which the link is made between all the Zookeeper nodes, by their id.
We compile the configuration file and launch the service with:
./zkServer.sh start
4- Install Spark
We install Apache Spark on our EC2 cluster and make it work with our Apache Cassandra instances in resilience. We will take a standard configuration which allows to elect a Master who will then distribute his jobs among the Workers. The election of the primary master is managed by Zookeeper.
We download Spark and extract it. Then, we add the necessary environment variables. The configuration details must be set in spark-env.sh, for the masters:
SPARK_LOCAL_IP= <PRIVATE_DNS_this_NODE>SPARK_MASTER_HOST= <PRIVATE_DNS_this_NODE>SPARK_MASTER_OPTS= “-Dspark.deploy.recoveryMode=ZOOKEEPER -Dspark.deploy.zookeeper.url=<PRIVATE_DNS_Node_Zk1>:2181 <PRIVATE_DNS_Node_Zk2>:2182, <PRIVATE_DNS_Node_Zk3>:2183”
The variable SPARK_MASTER_OPTS indicates the usage of Zookeeper for the recovery mode, and references the address of the Zookeeper nodes.
For the workers, this configuration must be set:
SPARK_LOCAL_IP= <PRIVATE_DNS_this_NODE>SPARK_MASTER_HOST= <PRIVATE_DNS_MASTER1,PRIVATE_DNS_MASTER1>
Then, we add at the end at the spark-defaults.conf file, on the masters and workers, the variables:
spark.master spark://PRIVATE_DNS_MASTER1:7077,PRIVATE_DNS_MASTER2:7077
spark.jars.packages datastax:spark-cassandra-connector:2.0.0-s_2.11
spark.cassandra.connection.host <PRIVATE_DNS_Slaves (separated by ',')>
The package spark-cassandra-connector must be added in order to link Spark and Cassandra.
To finish, we install Zeppelin to our masters.
5- Start the cluster
In order to start the cluster, we need to start, in this order:
- Zookeeper on its 3 nodes;
- Spark on the masters;
- Spark on the workers;
- Cassandra on the workers;
- Zeppelin on a master.
The load on each server may be displayed with the command htop at any time.
Conclusion
This project let us familiarize ourselves with a cloud distributed system, on AWS. We learnt how the different component interact with each others, especially Spark and Cassandra. We also saw the different aspects to take into account to set a persistent system, especially by choosing the correct number of nodes, the more adapted database and by setting up Zookeeper.
An important step was to choose the database management system, based on the constraints of the project and the characteristics of the systems that we know.
We detail the use of this infrastructure in this article.
You can see the complete code and project explanations on the GitHub repository of the project.
Illustration photo by Kawser Hamid from Pexels